
Amazon sellers already pay for enough things.
There is Amazon Tax, Amazon Ads, inventory tools, research tools, keyword tools, freelancers, samples, freight, product photography, and then usually some kind of spreadsheet setup on top of it. So paying another $6–12 per month just to have a custom email like support@yourbrand.com can feel a bit annoying, especially when the brand is still small.
What if I told you that you could get a branded Gmail address free of charge?
The only cost you will incur during this process is for your domain, which you would have to pay for anyway according to Amazon's terms of service.
Any other supportive service that will be mentioned here will be at no cost.
This guide walks you through steps so you can receive email at addresses like:
support@yourbrand.comwholesale@yourbrand.comsuppliers@yourbrand.com
…and have everything land inside your existing Gmail inbox.
I use this kind of setup when I want a brand to look more real, but I do not yet want another monthly software bill. It is not perfect, and it is not a full business email suite. But for many Amazon sellers, it is enough.
One important note before we start: this is not a replacement for Amazon Buyer-Seller Messaging. For order-specific buyer communication, stay inside Amazon’s own systems. Amazon’s FBM guidance points sellers to Buyer-Seller Messaging for buyer communication around orders and customer service. Use your custom email for brand operations, suppliers, agencies, invoices, wholesale leads, product development, and your own website support — not to bypass Amazon’s communication rules. (Sell on Amazon)
What you are actually setting up (quick overview)
This setup gives you a custom branded email address without paying for Google Workspace.
We'll use Cloudflare -- one of the most widely used internet infrastructure services in the world.
Cloudflare receives emails sent to your branded email address, then forwards them to your personal Gmail inbox.
So, for example:
Someone emails you atsupport@yourbrand.com
Cloudflare forwards it toyourpersonal@gmail.com
Then you can reply from Gmail using:support@yourbrand.com
This costs $0/month for email. You still need to pay for the domain itself, usually around $10–15/year depending on the registrar and extension. anyway, Amazon requires you to have one.
Who this is good for
This is a good fit for:
Small Amazon private label brands
Solo sellers
Side projects
New DTC brand websites
Supplier communication
Wholesale inquiries
Press or partnership emails
A simple “support@” address on packaging or inserts (assuming it follows Amazon rules)
It is not ideal for:
Large teams
High-volume outbound sales
Cold email campaigns
Enterprise brands
Deliverability-sensitive email operations
A proper shared helpdesk setup
For an average Amazon brand, I would not over-engineer it. A clean branded inbox is often enough at the start.
What you need
You need four things:
A domain name
A Gmail account
A free Cloudflare account
Access to your domain registrar (Godaddy, namecheap, etc), so you can change nameservers (no worries I'll explain how exactly)
That is it.
You do not need Google Workspace. You do not need Microsoft 365. You do not need a paid mailbox provider.
Step 1: Buy a domain for your Amazon brand (if you haven't yet)
First, buy a domain for your brand.
You can use Namecheap, Porkbun, GoDaddy, Cloudflare Registrar, or basically any normal domain registrar. For Amazon sellers, I would keep it simple and pick a domain that matches your brand name as closley as possible.
A few practical tips:
- Try to get the .com if it is available.
- Avoid weird spelling if customers might type it manually.
- Keep it short enough to print on packaging.
- Do not pick a domain that looks too close to another brand.
- Check that the name is not already used in your category.
Cheaper domain extensions like .xyz, .site, or .online can work, but for an Amazon brand I still prefer .com when possible. It just looks more familiar.
Step 2: Add the domain to Cloudflare
Create a free Cloudflare account (https://www.cloudflare.com), then add your domain.
In the current Cloudflare dashboard, the flow may appear as Domains → Onboard a domain. Older tutorials often say Add a site, so do not be surprise if the wording is a bit different. Cloudflare’s own docs describe the onboarding flow as entering your domain, reviewing detected DNS records, choosing a plan, and then updating your domain’s nameservers at your registrar. (Cloudflare Docs)
The rough steps are:
Go to Cloudflare https://www.cloudflare.com
Open Domains and Add domain

Choose Connect a domain
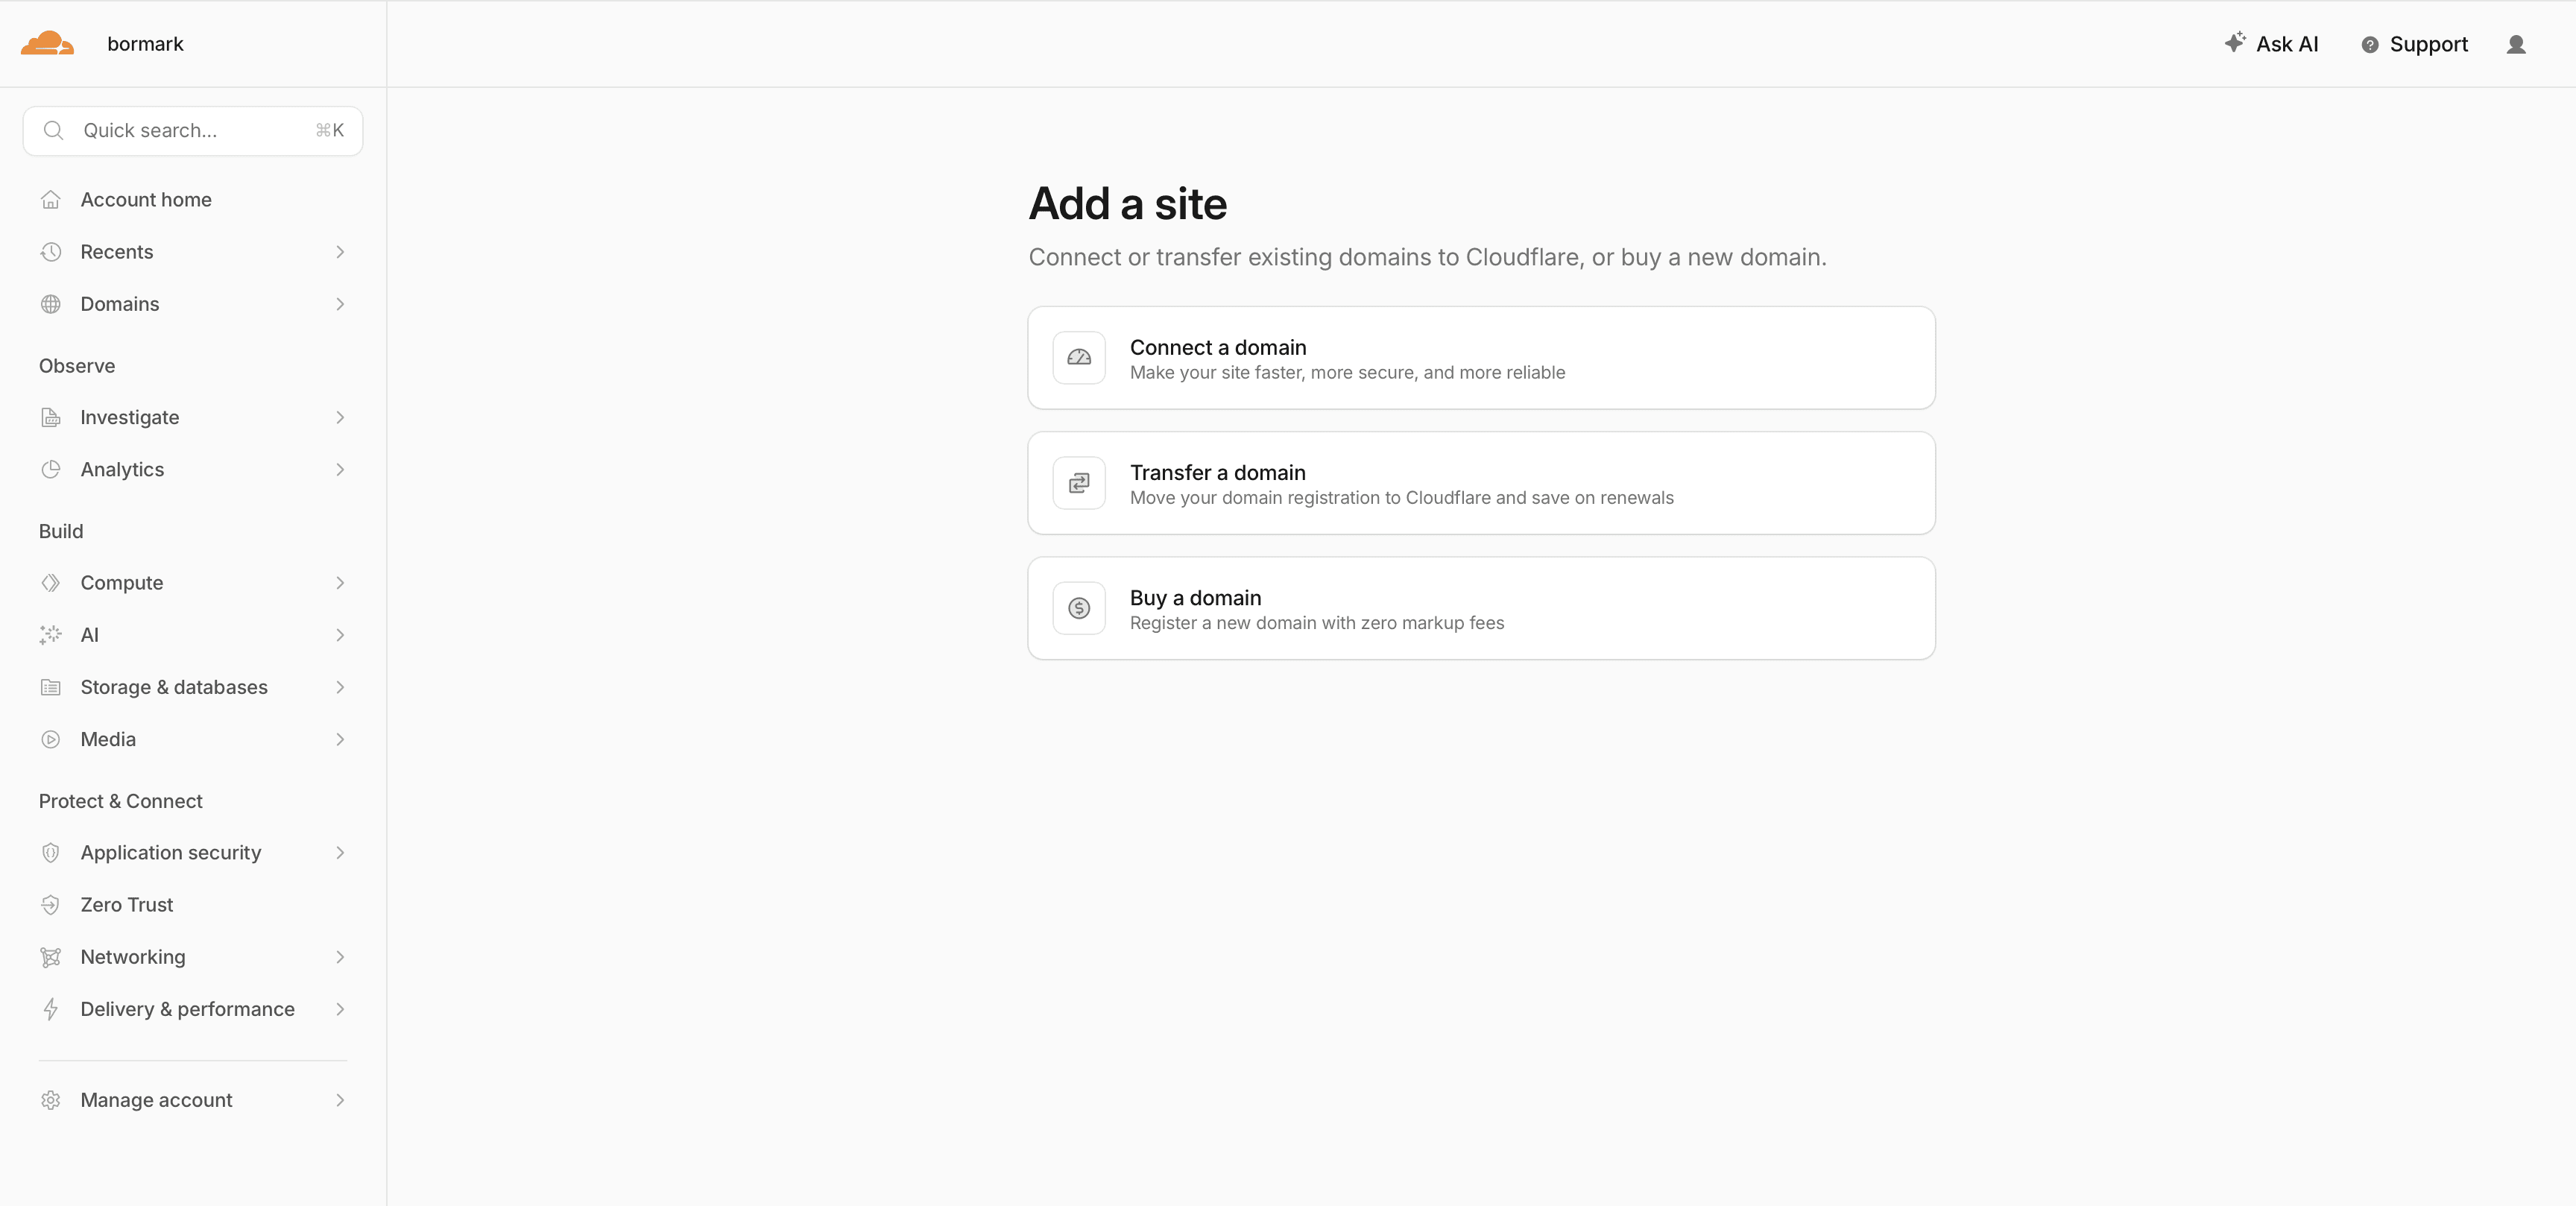
Enter your domain, like
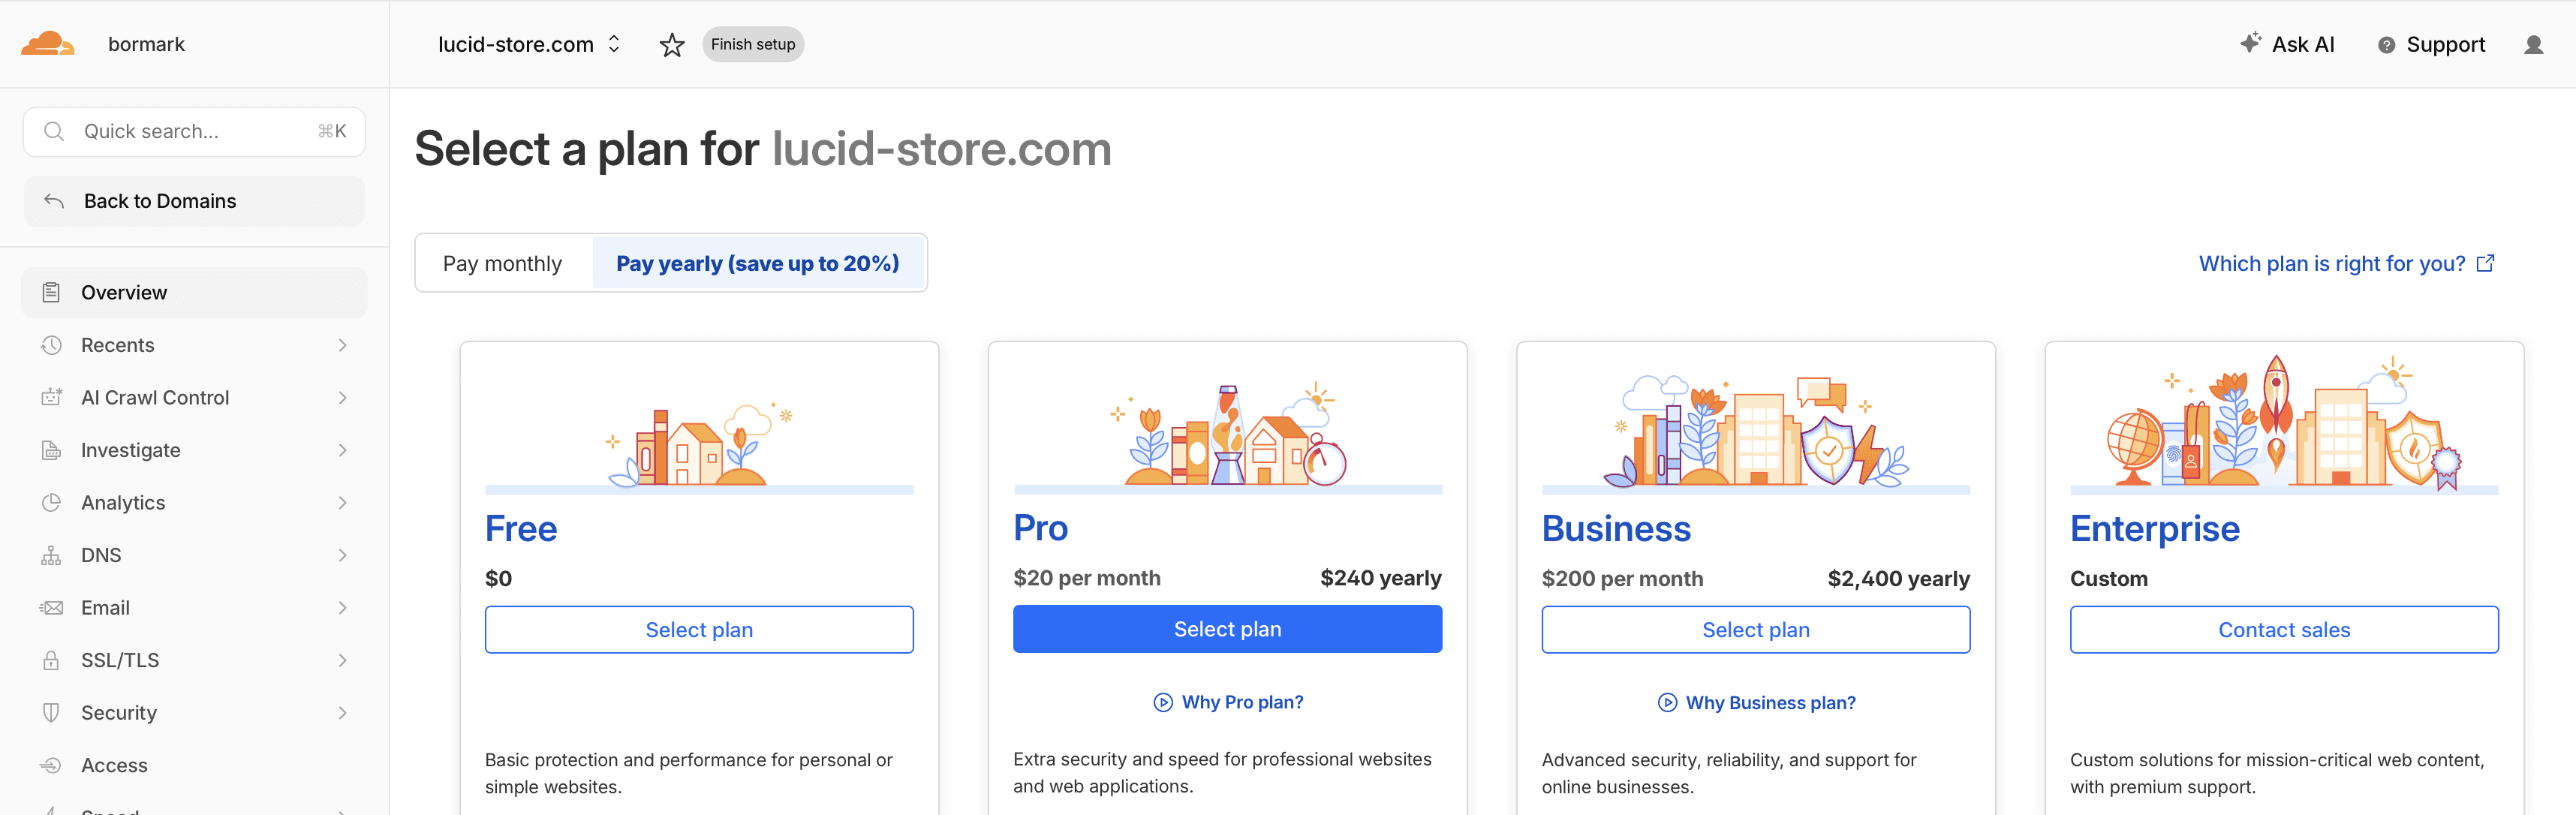
yourbrand.comSelect the Free plan
Let Cloudflare scan your DNS records
Review the records Cloudflare found
Cloudflare will give you two nameservers
Go back to your domain registrar (Godaddy, Namecheap, etc.)
Replace your old nameservers with the two Cloudflare nameservers
After that, wait for DNS to update.
Sometimes it is fast. Sometimes it takes longer. Cloudflare’s Email Service docs say DNS propagation can take up to 24 hours, though it is often more like 5–15 minutes in normal cases. (Cloudflare Docs)
Step 3: Enable Cloudflare Email Routing
Once your domain is active in Cloudflare, turn on Email Routing.
Depending on your dashboard version, you may see this under:
Email Routing
The steps are usually:
Open your domain in Cloudflare
Go to Email -> Email Routing
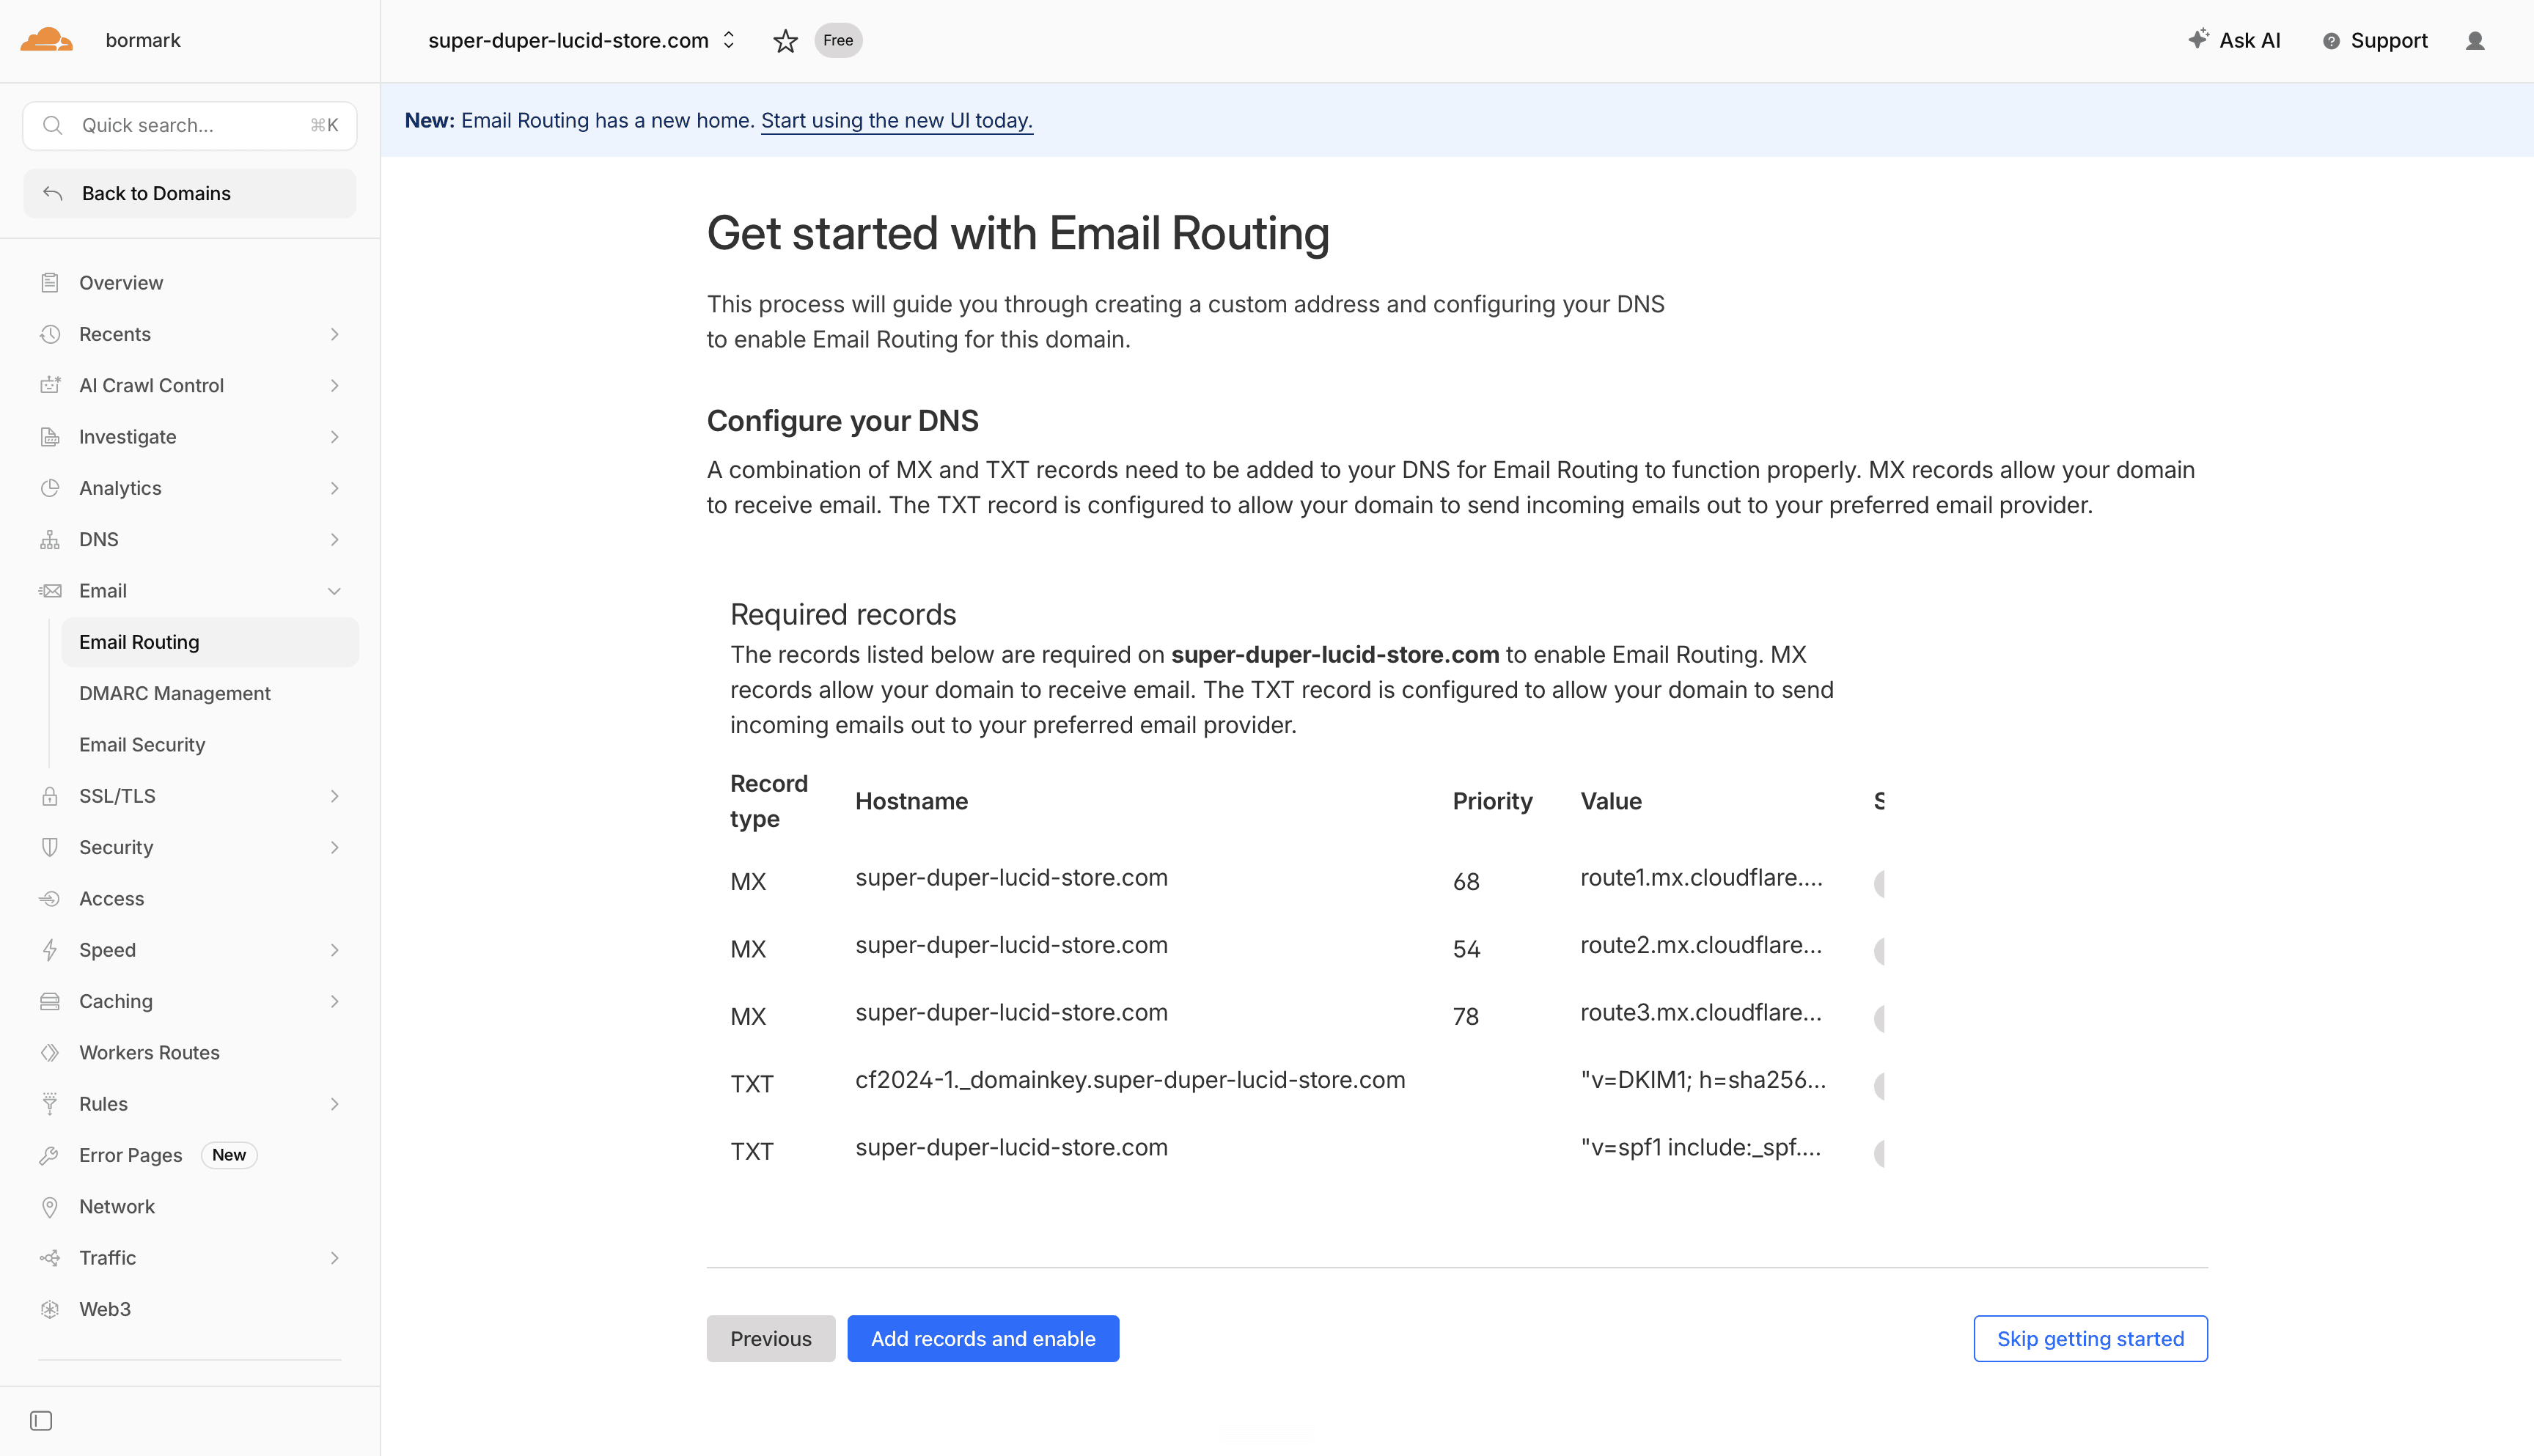
Click Get started or Onboard domain
Let Cloudflare add the required DNS records, click Add records and enable
Confirm the destination email address, such as your Gmail inbox yourpersonal@gmail.com
Click the verification email Cloudflare sends you to your Gamil inbox
Cloudflare will add the records needed to receive mail for your domain. For Email Routing, this includes Cloudflare MX records and related TXT records such as SPF and DKIM for routing. You can check these later under Email Routing settings. (Cloudflare Docs)
Important: Cloudflare Email Routing is forwarding only. Cloudflare’s own docs say the custom addresses work as forwarding addresses, and that Email Routing does not process outbound email or provide an SMTP server. (Cloudflare Docs)
In normal language, that means Cloudflare helps receive and forward the email. Gmail handles your actual inbox. Sending from the custom address is configured separately inside Gmail.
Step 4: Create your custom email addresses
Now create the addresses you want.
In Cloudflare, go to:
Domain → Email → Email Routing → Routing Rules → Create Address
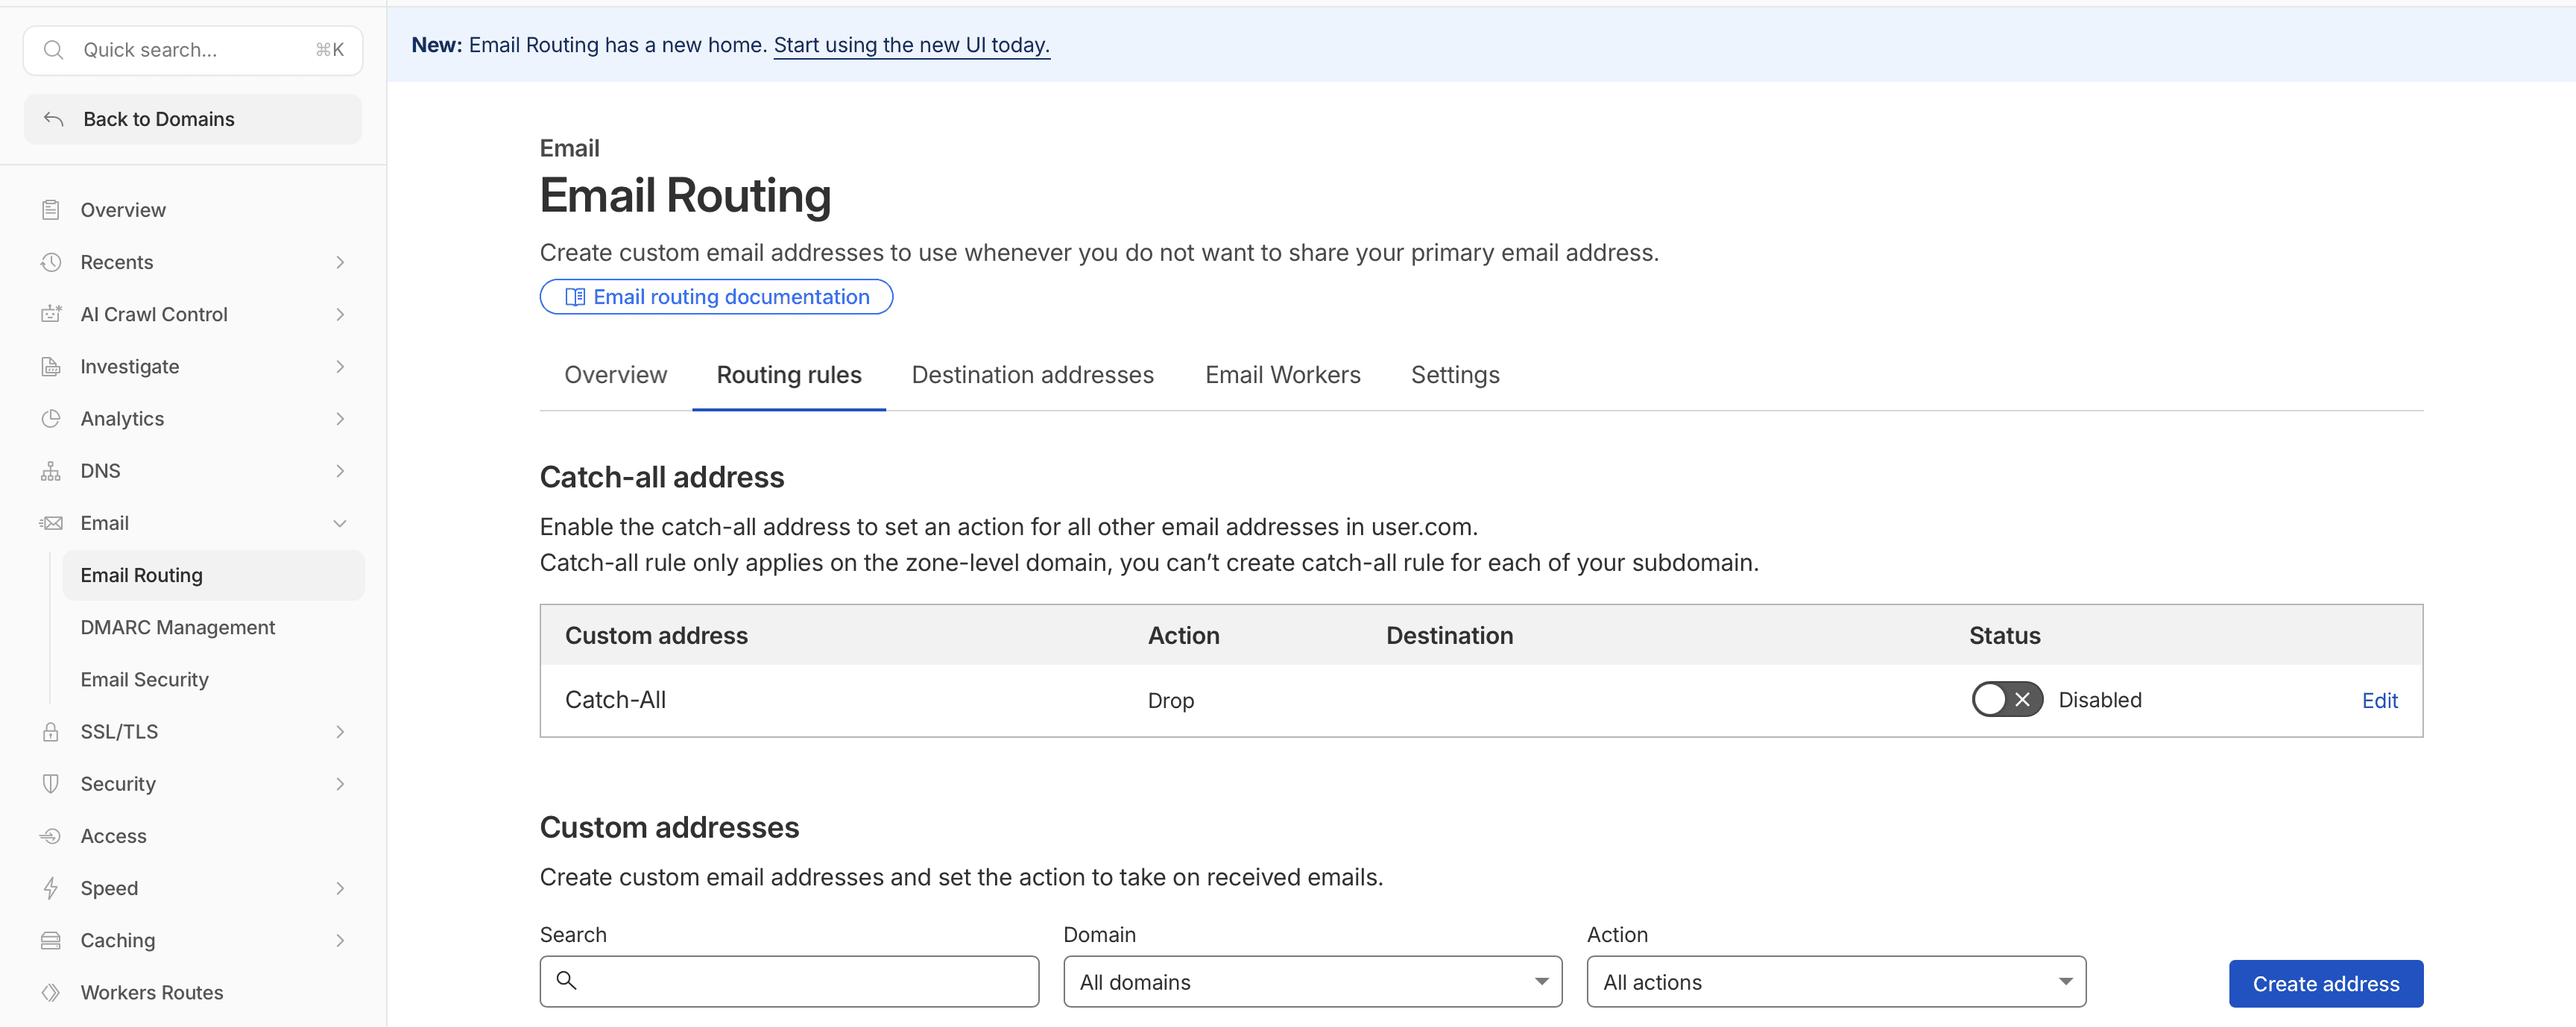
Cloudflare’s docs describe creating a custom address by entering the local part of the email, choosing an action such as “Send to an email,” and selecting a verified destination address. (Cloudflare Docs)
For example, if your domain is yourbrand.com, you could create:
support@yourbrand.comhello@yourbrand.comwholesale@yourbrand.comsuppliers@yourbrand.cominvoices@yourbrand.com
For Amazon sellers, I would usually start with just two or three:
support@yourbrand.comsuppliers@yourbrand.com
I do NOT recommend creating twenty email addresses just because you can.
It gets messy quick.
Step 5: Test receiving email
Before touching Gmail sending settings, test receiving first.
Ask someone to send an email from another email address to your new custom address. For example:
From: your teammate's email
To: support@yourbrand.com
Then check your Gmail inbox.
Also check Spam, Promotions, Updates, and All Mail if it does not show up right away.
Once the email arrives in Gmail, your Cloudflare routing is working 🎉
Step 6: Set up Gmail so you can send from the custom address
Now we make Gmail send from your branded email address.
Open Gmail and go to:
Settings gear → See all settings → Accounts → Send mail as (section) → Add another email address
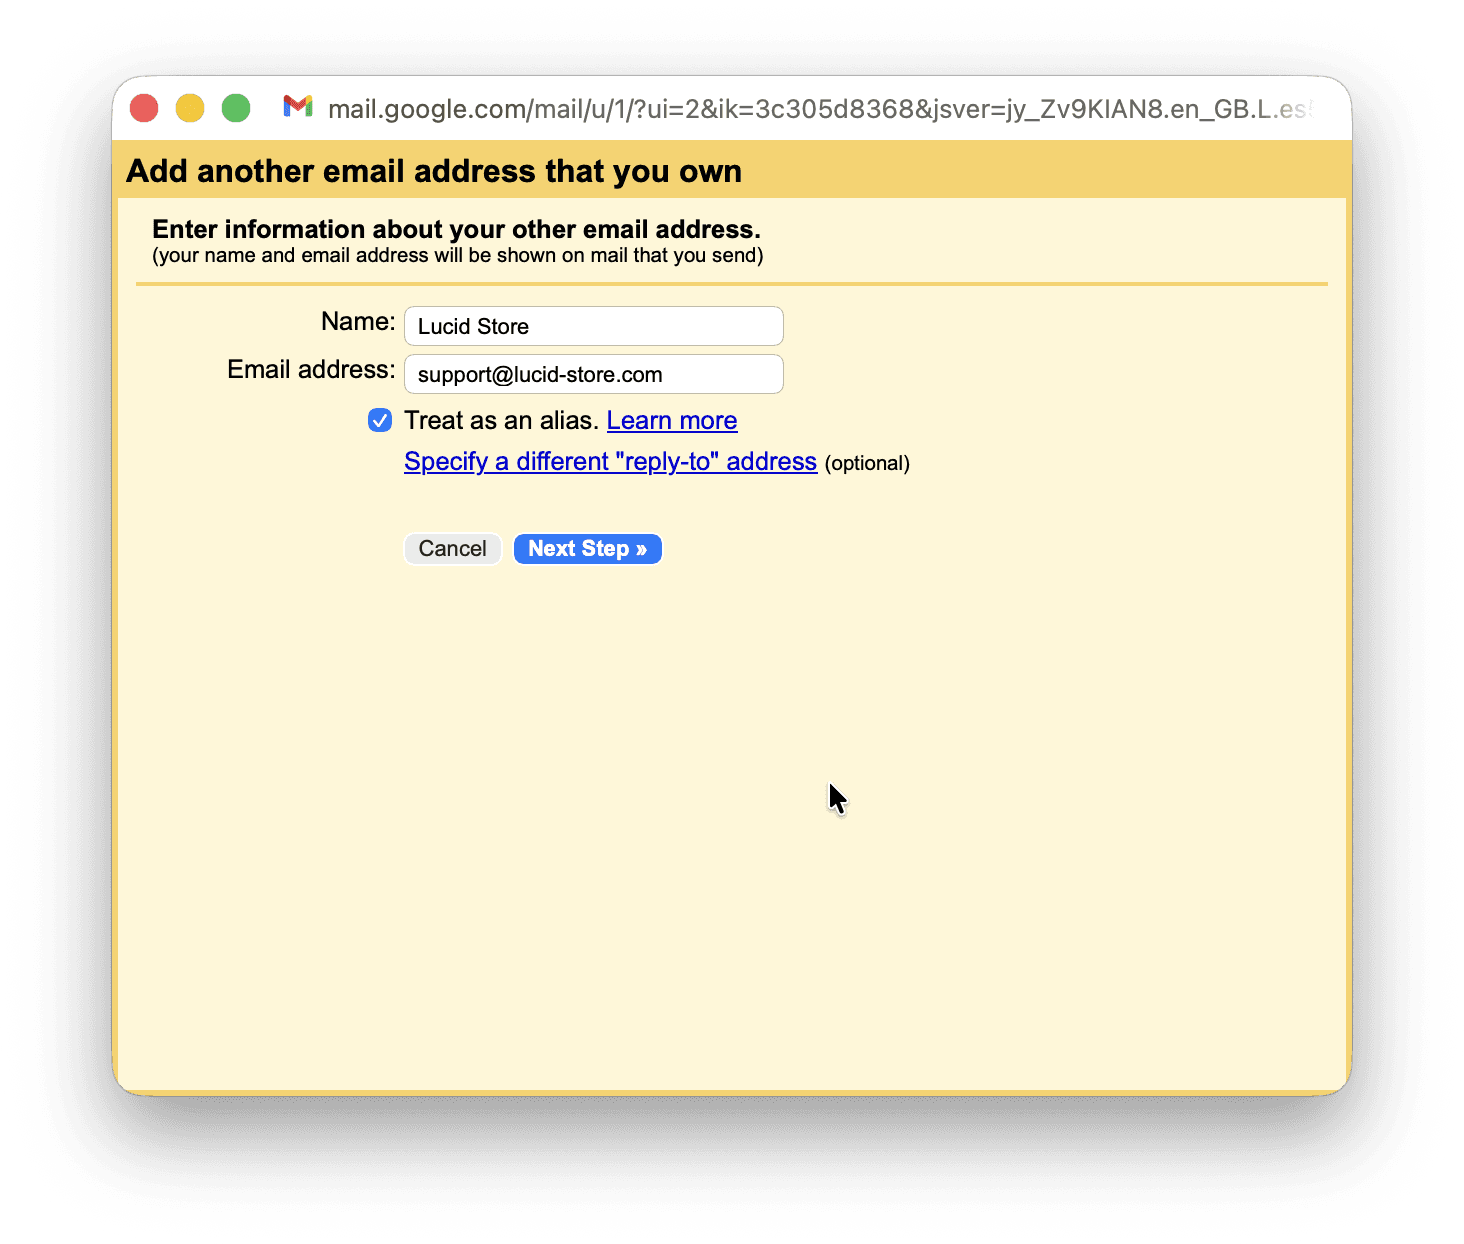
Enter your name and your custom email address. This is actually what your receivers of your emails will see when getting emails from you. So it's important to make it right and beautiful
For example:
Name: Your Brand
Email address: support@yourbrand.com
Then click the blue Next button.
Use these settings:
SMTP server: smtp.gmail.com
Port: 587
Security: TLS
Username: your full Gmail address, like yourname@gmail.com
Password: a Google App Password, not your normal Gmail password
Google’s developer documentation lists smtp.gmail.com as Gmail’s outgoing SMTP server, with port 587 for TLS and 465 for SSL. (Google for Developers)
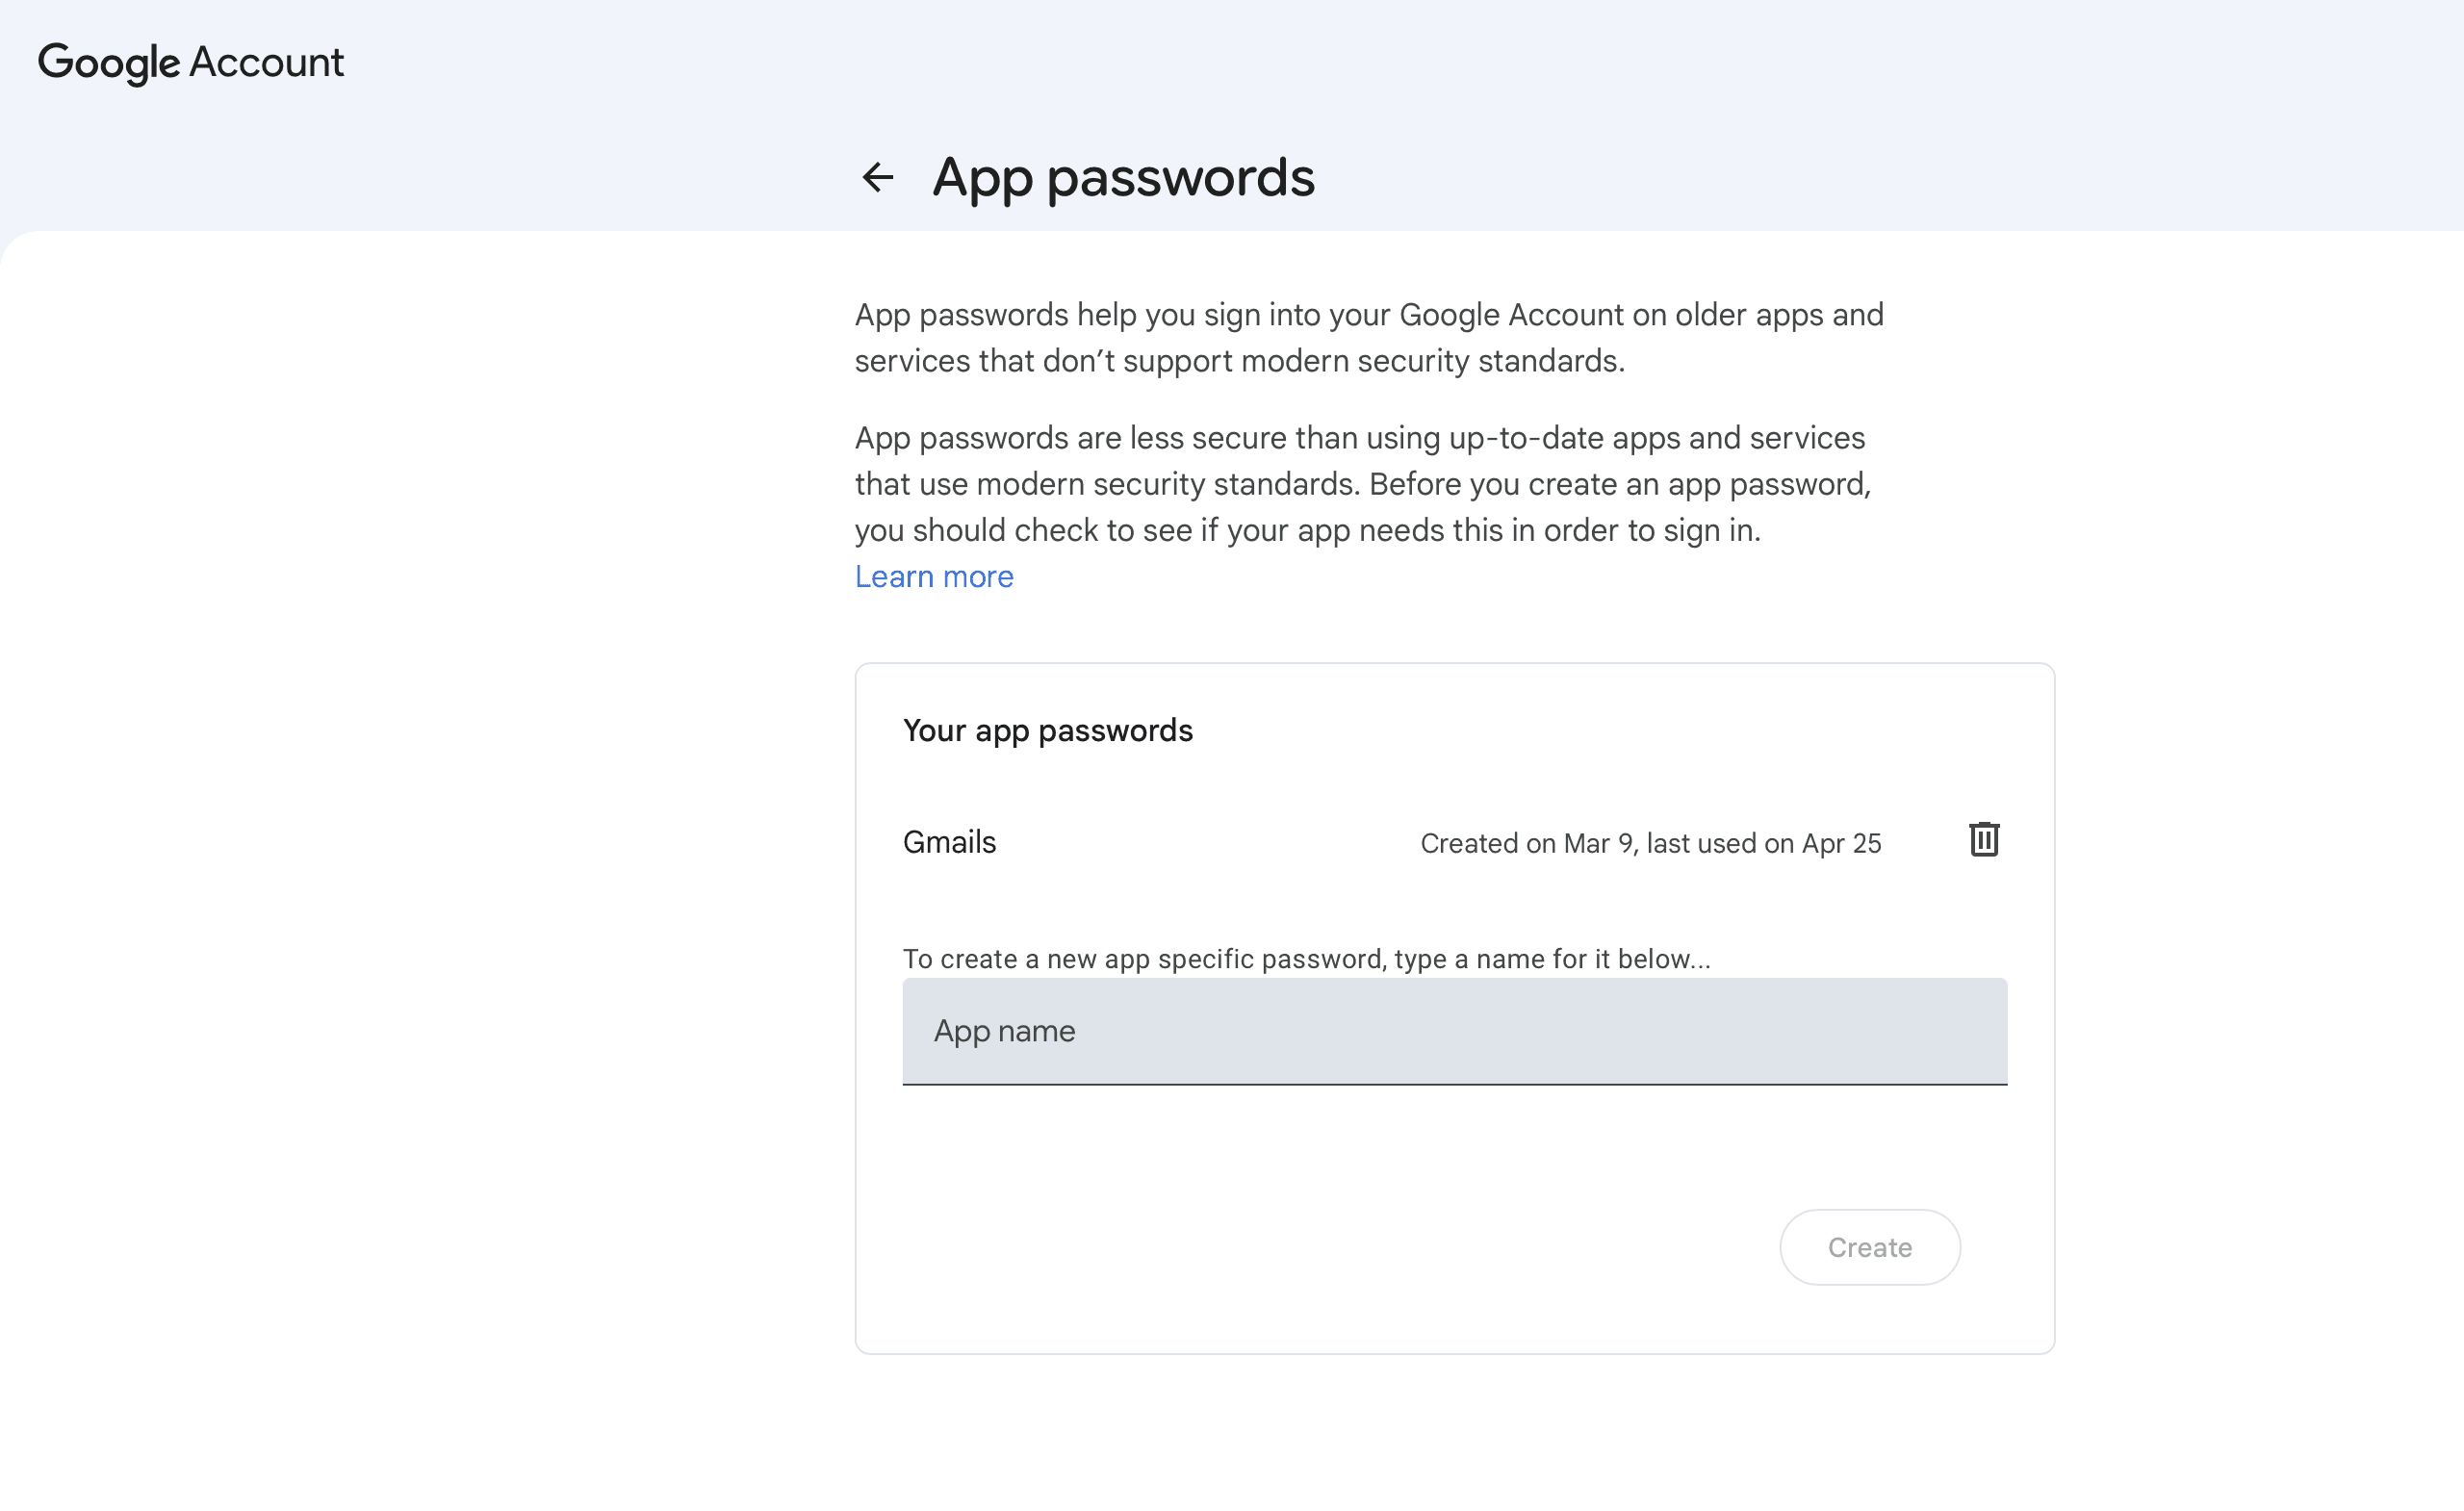
The password part is where people usually get stuck.
You normally need a App Passwords. Google describes this as a 16-digit passcode for signing in from apps or devices, and it generally requires 2-Step Verification to be enabled on your Google account. (Google Help)

To create it:
Go to your Google Account https://myaccount.google.com/u/0/
Open Security
Turn on 2-Step Verification, if it is not already on
Find App passwords
Create one for Mail
Copy the 16-digit password
Paste that into Gmail’s SMTP password field
Then click Add Account.
Gmail will send a verification email to your custom address. Cloudflare forwards that email back into your Gmail inbox. Open it and click the verification link, or copy the code into Gmail.
Now when you compose a new email in Gmail, you should be able to choose your custom address in the From field. 🎉 🎉 🎉
Now your Amazon business has its branded email address directly in Gmail at no cost. 🎉
Step 7: Check your DNS records
After everything works, do one last DNS check.
In Cloudflare, go to your domain → Domain → Email Routing → Settings
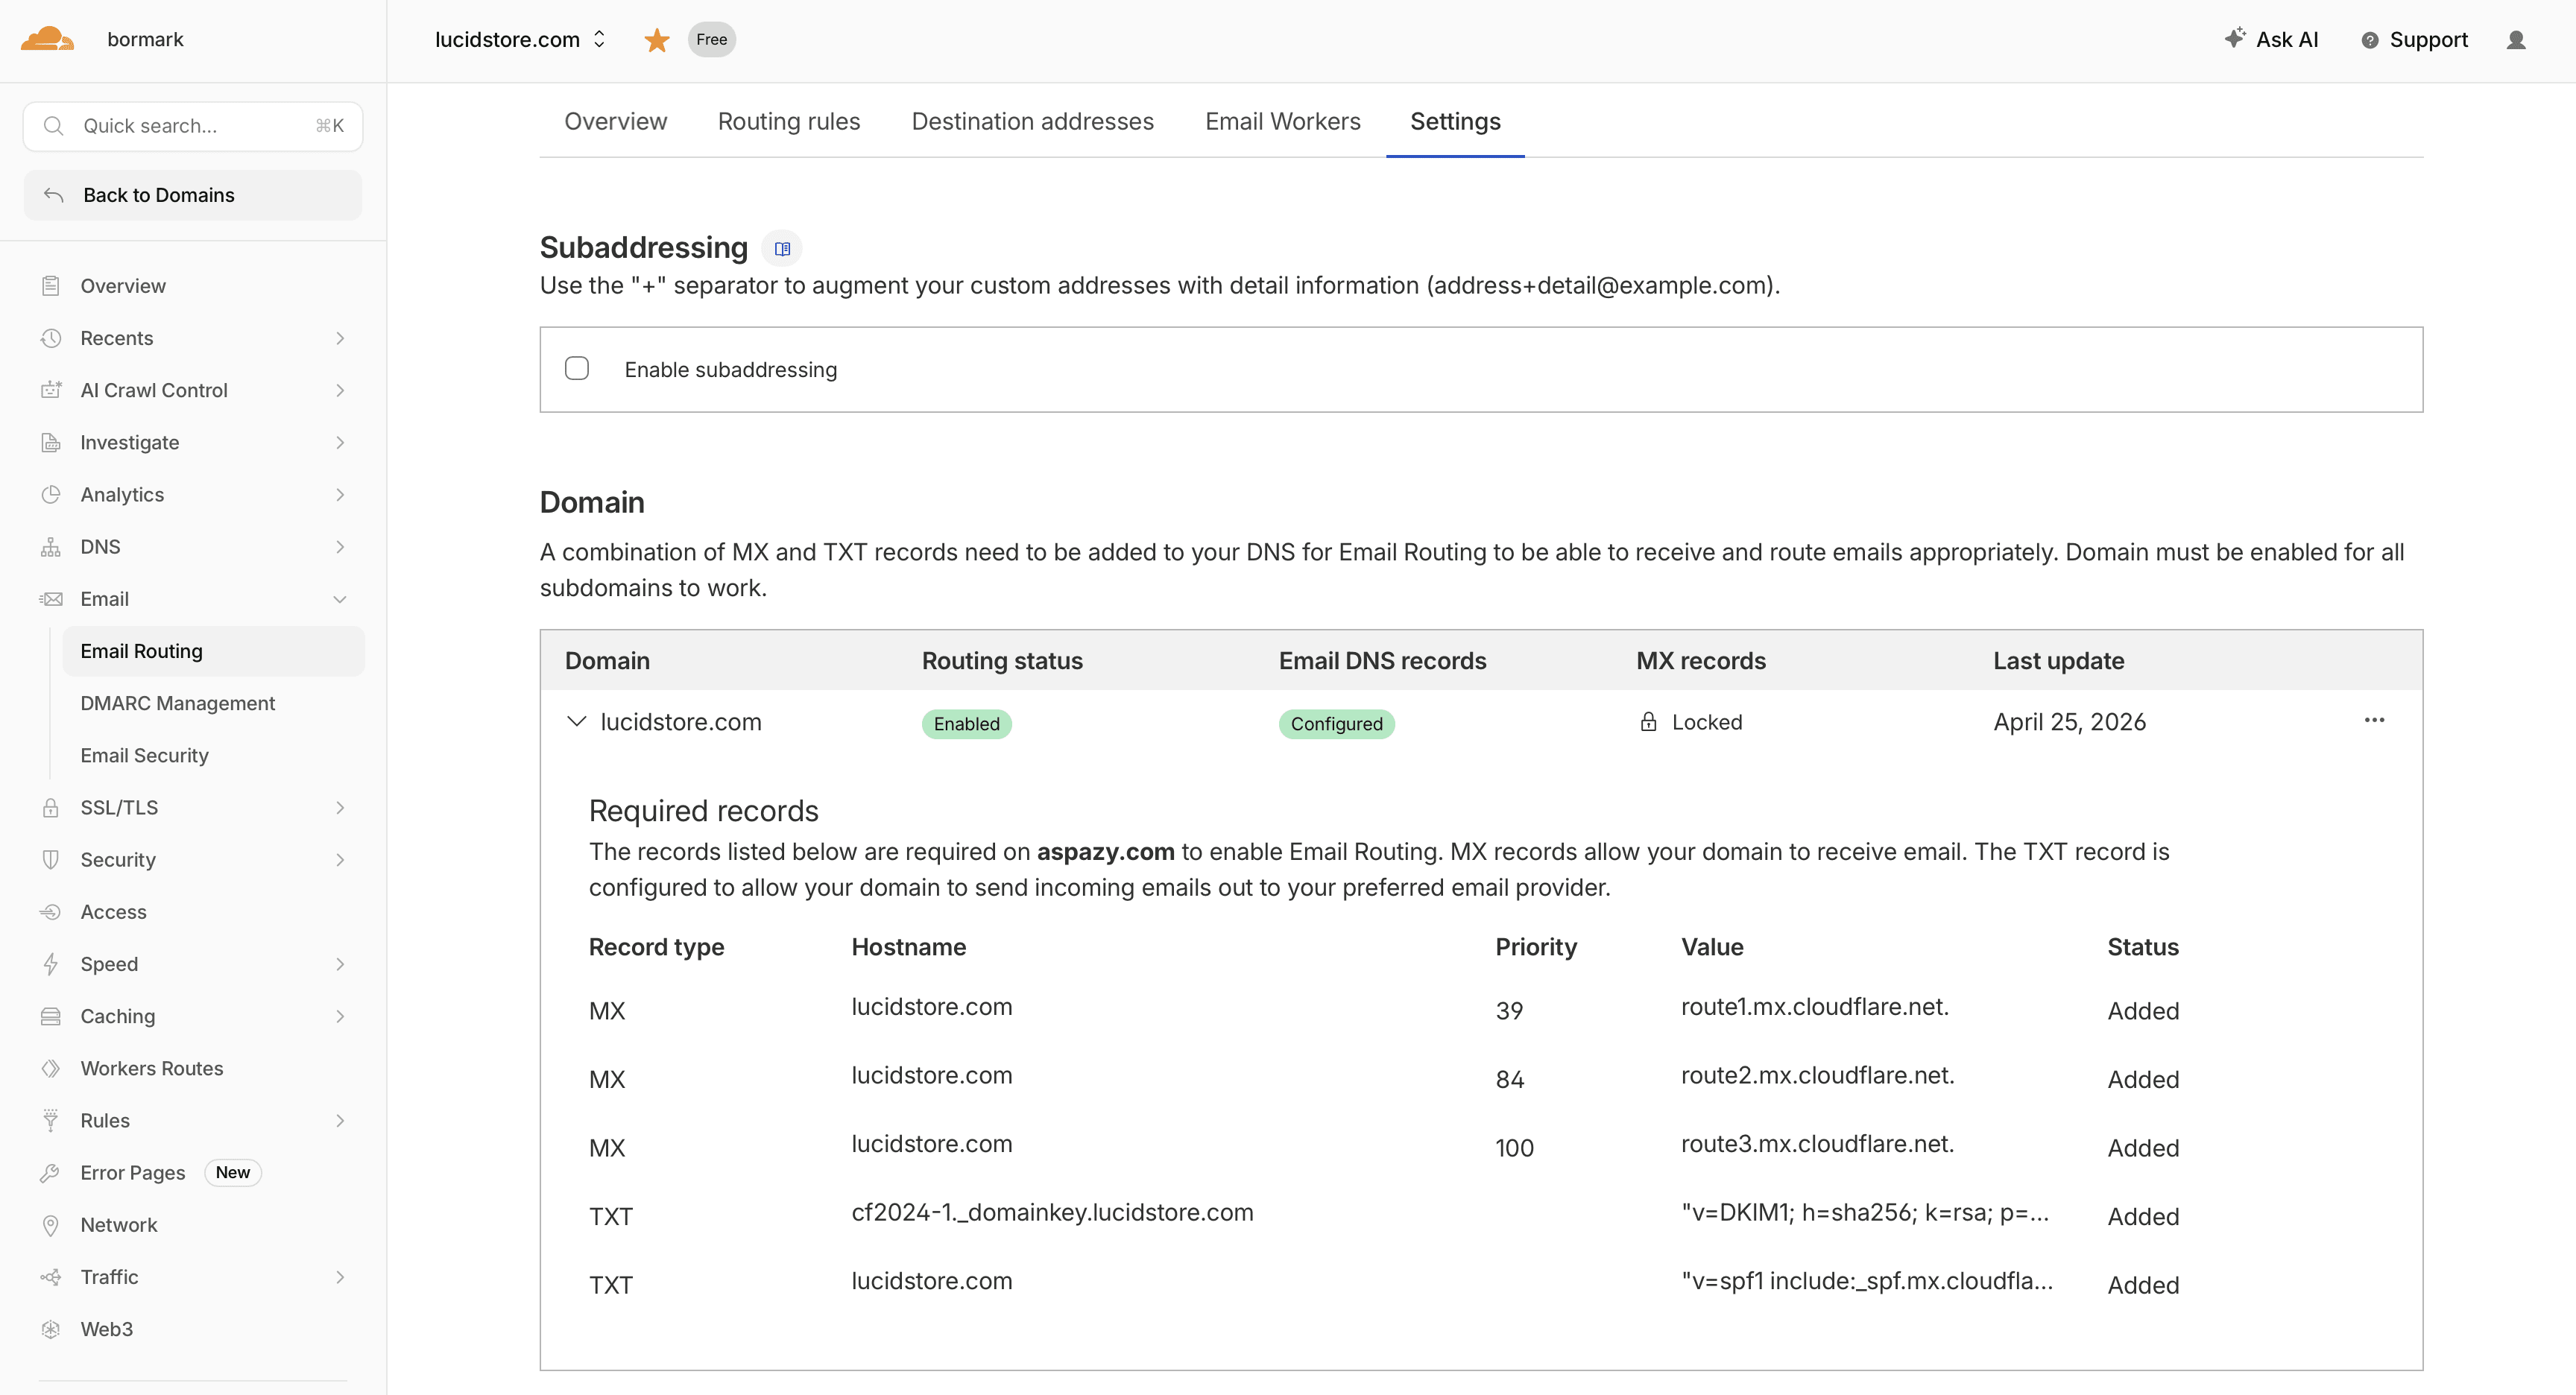
You should see Cloudflare MX records similar to:
route1.mx.cloudflare.netroute2.mx.cloudflare.netroute3.mx.cloudflare.net
You should also see an SPF TXT record. Cloudflare’s Postmaster docs show the Email Routing SPF include as:
v=spf1 include:_spf.mx.cloudflare.net ~all (Cloudflare Docs)
But here is the part that matters when you also send through Gmail.
If Gmail is sending email for your domain, your SPF record should also include Google. Google’s SPF docs show the Google include as:
include:_spf.google.com (Google Workspace Help)
So a combined SPF record may look like this:
Do not create two separate SPF records for the same domain. Just edit existing one in Cloudflare and substitute it with the one above.
This matters more than people think. If you have Shopify, Klaviyo, Amazon SES, SendGrid, or another tool sending email from your domain, those senders may also need to be included. Otherwise, your emails are more likely to fail authentication or land in spam. Google’s sender guidelines specifically tell senders to authenticate with SPF or DKIM and make sure third-party senders are included. (Google Help)
A note about DKIM and deliverability
This setup is cheap because it is not a full business email product.
When you use regular Gmail with “Send mail as,” you are not getting the same clean domain-level DKIM setup that you would get with Google Workspace. That does not mean every email will go to spam. Many will be fine, especially for normal one-to-one communication.
But it does mean this is not the setup I would use for high-volume outbound email, cold email campaigns, or serious customer support at scale.
If email deliverability becomes important to the business, move to Google Workspace, Microsoft 365, Fastmail, Zoho Mail, or another proper mailbox provider. For early Amazon seller operations though, this Cloudflare + Gmail setup can carry you for quite a while.
Important limitations
Here are the catches, because there are always catches.
Cloudflare does not give you a mailbox, inbox UI, or email archive.
Cloudflare does not support messages larger than 25 MiB (same as Gmail). (Cloudflare Docs)
Free Gmail storage is not unlimited. A personal Google account includes up to 15 GB of storage shared across Gmail, Drive, and Photos. (Google Help)
This is not a shared inbox. If you have two support agents and need assignments, notes, collision detection, saved replies, and reporting, use a proper helpdesk.
And again: do not use this to move Amazon order communication outside of Amazon’s rules. Keep Amazon buyer messages where Amazon expects them.
What the finished setup looks like
After setup, it works like this:
A supplier emails suppliers@yourbrand.com
You receive it in Gmail
You reply from suppliers@yourbrand.com
A customer emails support@yourbrand.com from your website
You receive it in Gmail
You reply from support@yourbrand.com
A wholesale lead emails wholesale@yourbrand.com
You receive it in Gmail
You reply from wholesale@yourbrand.com
It looks more professional than using yourbrand123@gmail.com, and it costs nothing monthly apart from the annual domain renewal.
It is one of those small, boring brand setup things that makes the business feel more real.
My recommendation for Amazon sellers
Use this setup if you are early, lean, and trying to avoid another subscription.
Use a proper paid mailbox when:
You have a team
You send a lot of email
You care deeply about deliverability
You need shared inbox features
You need admin control over employee accounts
You want proper DKIM signing for your domain
You are building a brand where email is a serious sales or support channel
For a one-person Amazon brand, I would start with:
hello@yourbrand.com for general brand emailsupport@yourbrand.com for website or product supportsuppliers@yourbrand.com for sourcing and manufacturing
That is probably enough.
This post is not sponsored by Cloudflare. I just like simple setups that save money without making the business look amateur.
For many Amazon sellers, this is exactly that: a professional custom email for roughly the annual cost of a domain, instead of another monthly subscription.
Authors

Alex Borisenko-Markovich